Streamline Windows Installs: A Comprehensive Guide to Windows Deployment Services Setup
Windows Deployment Services (WDS) stands as a pivotal technology provided by Microsoft, designed to simplify and centralize the deployment of Windows operating systems across a network environment. It eradicates the conventional necessity for physical media like DVDs or USB drives for OS installations, offering a network-based solution that significantly enhances efficiency and scalability in managing numerous computers. This comprehensive guide is structured to navigate you through the essential steps of installing and configuring WDS on a Windows Server, ensuring a smooth and streamlined operating system deployment process throughout your network infrastructure.
How to Install and Configure Windows Deployment Services?
This section will provide a detailed walkthrough on setting up and configuring Windows Deployment Services on a Windows server. Follow these steps to successfully implement WDS in your environment:
- Ensure the prerequisites are satisfied
- Install the Windows Deployment Services Role
- Configure Windows Deployment services
- Add boot and install images
- Add a boot image to the WDS server
- Add the Install image to the server
Let’s delve into each step to ensure a successful WDS deployment.
1] Ensure the Prerequisites are Satisfied
Before initiating the installation and configuration of Windows Deployment Services, it is absolutely crucial to confirm that all necessary prerequisites are in place. Neglecting this preliminary step can lead to complications and potential failures during the installation or subsequent operation of WDS. Properly configured infrastructure components are the foundation for a seamless WDS experience.
Here are the essential prerequisites that must be satisfied:
-
Active Directory (AD): The server intended to host WDS must be either a domain controller within an Active Directory domain or a member server joined to a domain. Active Directory integration is fundamental for WDS to effectively manage client authentication and authorization during the deployment process. This ensures secure and controlled OS deployments within the network.
-
DHCP (Dynamic Host Configuration Protocol): WDS heavily relies on DHCP to provide Preboot Execution Environment (PXE) booting capabilities to client computers. DHCP is essential for automatically assigning IP addresses and network configuration parameters to clients initiating a network boot. This allows clients to discover and connect to the WDS server to begin the OS deployment. Ensure that a functioning DHCP server is present and properly configured on your network.
-
DNS (Domain Name System): A properly configured and operational Domain Name System (DNS) infrastructure is mandatory. DNS resolution is critical for clients to locate the WDS server by name and for the WDS server to interact with other domain services. Verify that your DNS settings are correctly configured and that the WDS server can be resolved by its hostname within the domain.
-
NTFS Partition: The WDS server necessitates an NTFS formatted partition to store boot images, install images, and other critical WDS files. NTFS is required due to its support for file permissions, security features, and reliability necessary for WDS operations. Ensure that you have a dedicated NTFS partition with sufficient free space allocated for WDS image storage.
By meticulously verifying that these prerequisites are in place, you lay a solid groundwork for a successful WDS installation and configuration, minimizing potential issues down the line.
2] Install the Windows Deployment Services Role
After confirming that all prerequisites are adequately met, the subsequent step in setting up Windows Deployment Service is to install the WDS server role. This role is the core component that enables the server to perform network-based operating system deployments to client computers. The installation process is straightforward using Server Manager.
Follow these steps to install the Windows Deployment Services role:
-
Launch Server Manager: Open Server Manager on your Windows Server. This can typically be done by searching for “Server Manager” in the Windows search bar or finding it in the Start Menu under “Windows Administrative Tools.”
-
Add Roles and Features Wizard: In the Server Manager dashboard, locate and click on “Add roles and features.” This action will initiate the Add Roles and Features Wizard, guiding you through the role installation process.
-
Select Installation Type: In the “Select installation type” window, choose the option “Role-based or feature-based installation.” This is the standard option for installing server roles like WDS. Click “Next” to proceed.
-
Select Destination Server: In the “Select destination server” window, choose “Select a server from the server pool.” From the server pool, select the server on which you intend to install the WDS role. This is usually the local server if you are performing the installation directly on the intended WDS server. Click “Next.”
-
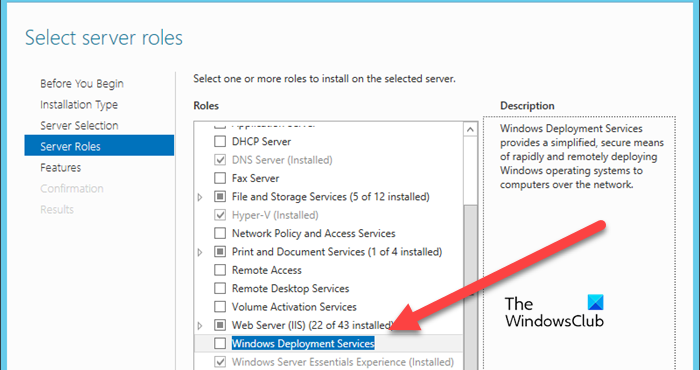
Select Server Roles: The “Select server roles” window is where you specify the roles to be installed. Scroll down the list of available roles and locate “Windows Deployment Services.” Tick the checkbox next to “Windows Deployment Services” to select it.
-
Add Features: Upon selecting “Windows Deployment Services,” a pop-up window might appear asking if you want to add required features. Click “Add Features” to automatically include any dependencies necessary for WDS to function correctly. Click “Next” in the “Select features” window.
-
Role Services Selection: The “Select role services” window will appear, presenting options for “Deployment Server” and “Transport Server.” By default, both “Deployment Server” and “Transport Server” boxes will be ticked, which is the recommended configuration for a full WDS installation. These services are essential for deploying and managing images. Click “Next.”
-
Confirmation and Installation: Review your selections in the “Confirm installation selections” window. Click “Install” to begin the installation process. Server Manager will display the installation progress.
-
Completion: Once the installation is complete, you will see a “Installation succeeded on [Server Name]” message. Click “Close” to exit the Add Roles and Features Wizard.
After completing these steps, the Windows Deployment Services role will be successfully installed on your server, preparing it for configuration.
3] Configure Windows Deployment Services
With the WDS roles successfully installed, the next critical phase is to configure Windows Deployment Services. Configuration involves defining storage locations, setting up PXE boot options, and determining how the server responds to client requests. Proper configuration is paramount for WDS to operate efficiently and securely within your network.
Follow these steps to configure Windows Deployment Services:
-
Launch WDS Management Console: Open Server Manager, navigate to the “Tools” menu in the top right corner, and select “Windows Deployment Services.” This will launch the Windows Deployment Services management console, the primary tool for configuring and managing WDS.
-
Server Configuration: In the Windows Deployment Services console, you will see a list of servers. Expand the “Servers” option in the left pane. You should see the name of the server where you installed WDS. Right-click on the server name and select “Configure Server.” This will initiate the Windows Deployment Services Configuration Wizard.
-
Configuration Wizard Introduction: The Windows Deployment Services Configuration Wizard will appear. Click “Next” to proceed past the introduction screen.
-
Integration Mode Selection: In the “Install Options” window, you will be presented with options to integrate WDS with Active Directory or configure it in standalone mode. For environments with Active Directory, it is highly recommended to choose “Integrated with Active Directory.” This provides centralized management and security. Select this option and click “Next.” Standalone mode is generally used for testing or non-domain environments and lacks the centralized management benefits of Active Directory integration.
-
Remote Installation Folder Location: You will be prompted to enter the path for the “Remote Installation Folder Location.” This folder will store all boot images, install images, and configuration files for WDS. Enter a suitable location on an NTFS partition with ample free space. It is advisable to use a dedicated folder for WDS images. Click “Next.” You might be prompted with a confirmation to create the folder if it doesn’t exist; click “Yes” to allow the wizard to create it.
-
PXE Server Initial Settings: In the “PXE Server Initial Settings” window, you need to configure how the WDS server responds to PXE boot requests from clients. You have several options to choose from:
- Do not respond to any client computers: WDS will not respond to any PXE requests. This is typically used when you want to temporarily disable WDS responses.
- Respond only to known client computers: WDS will only respond to clients that are pre-staged in Active Directory. This enhances security by limiting deployments to authorized machines.
- Respond to all client computers (recommended for most environments): WDS will respond to all PXE requests from clients on the network. This is the most common and convenient option for general deployment scenarios.
Select the “Respond to all client computers” option for general deployment scenarios. Click “Next.”
-
Configuration Completion: The WDS Configuration Wizard will proceed with the configuration process. This might take a few moments. Once the configuration is complete, you will be presented with a “Completing the Windows Deployment Services Configuration Wizard” screen. Uncheck the “Add Images to the Server Now” option as we will cover adding images in subsequent steps. Click “Finish” to close the wizard.
The Windows Deployment Services server is now configured and ready to host boot and install images.
4] Add Boot and Install Images
Boot and Install images are the core components that WDS uses to deploy operating systems. The boot image is a minimal Windows Pre-installation Environment (Windows PE) that boots the client machine and initiates the deployment process. The install image contains the actual operating system files that will be installed on the client computers.
To prepare these images, you will typically use the Windows installation media (DVD, ISO, or USB).
Here’s how to prepare the necessary files:
-
Access Windows Installation Media: Insert the Windows installation media (DVD or USB drive) into the WDS server or mount the Windows Installation ISO file if you are using a virtual environment.
-
Locate
boot.wim: Navigate to the\sourcesfolder on the Windows installation media. Copy theboot.wimfile from this location to a folder on your WDS server. This file will be used as the boot image for WDS. -
Convert
install.esdtoinstall.wim(if necessary): Modern Windows installation media often includes aninstall.esdfile, which is an encrypted and compressed image format. WDS requiresinstall.wimformat. If your installation media containsinstall.esd, you need to convert it toinstall.wim. If your media already containsinstall.wimin the\sourcesfolder, you can use that directly and skip the conversion.To convert
install.esdtoinstall.wim, use the Deployment Image Servicing and Management (DISM) tool:-
Open Command Prompt as Administrator: Search for “cmd” in the Windows search bar, right-click on “Command Prompt,” and select “Run as administrator.”
-
Navigate to the directory containing
install.esd: Use thecdcommand to navigate to the directory whereinstall.esdis located. For example, if your installation media drive isD:, you would type:cd D:\sources -
List available images in
install.esd: Use the following DISM command to list the images contained within theinstall.esdfile and their corresponding index numbers:dism /Get-WimInfo /WimFile:install.esdThis command will display information about each Windows edition available in the
install.esdfile, along with an index number for each. Note the index number of the Windows edition you want to deploy (e.g., Windows 10 Pro might be index 1). -
Export the desired image to
install.wim: Use thedism /export-imagecommand to convert and export the desired Windows edition frominstall.esdtoinstall.wim. ReplaceSourceIndexwith the index number you noted in the previous step, and specify a destination path for theinstall.wimfile. For example, to export the image at index 1 toC:\WDS\install.wim, use the command:dism /export-image /SourceImageFile:install.esd /SourceIndex:1 /DestinationImageFile:C:\WDS\install.wim /Compress:max /CheckIntegrityThis command will convert the selected image to
install.wim, apply maximum compression, and check file integrity. The conversion process may take some time.
Once the conversion is complete (if needed) and you have both
boot.wimandinstall.wimfiles ready, you can proceed to add them to the WDS server. -
5] Add a Boot Image to the WDS Server
After preparing the boot.wim file, the next step is to import it into the Windows Deployment Services server. The boot image is essential for initiating the network boot process on client machines and loading Windows PE, the pre-installation environment.
Here’s how to add a boot image to WDS:
-
Open WDS Management Console: Launch the Windows Deployment Services console by navigating to Server Manager > Tools > Windows Deployment Services.
-
Navigate to Boot Images: In the WDS console, expand the “Servers” section, then expand the name of your WDS server. Right-click on the “Boot Images” node and select “Add Boot Image.” This will launch the Add Boot Image Wizard.
-
Browse for
boot.wim: In the “Image File” field, click “Browse” and navigate to the location where you saved theboot.wimfile (copied from the Windows installation media). Select theboot.wimfile and click “Open.” -
Image Name and Description: After selecting the
boot.wimfile, you will be prompted to specify an image name and description. Customize the “Image name” to be descriptive, as this name will be displayed during the PXE boot process on client machines. For example, you might name it “Windows 10/11 Boot Image.” You can also add an optional description. Click “Next.” -
Summary and Confirmation: Review the summary of the boot image you are about to add. Click “Next” to begin adding the boot image to the WDS server.
-
Completion: The wizard will display the progress of adding the boot image. Once the process is complete, you will see a “Successfully added boot image” message. Click “Finish” to close the wizard.
The boot image is now successfully added to the WDS server and will be available for clients booting from the network.
6] Add the Install Image to the Server
Following the addition of the boot image, the next crucial step is to add the install image. The install image, derived from the install.wim file, contains the actual operating system that will be deployed to client machines. This image is what gets installed onto the hard drives of the target computers during the deployment process.
Follow these steps to add an install image to the WDS server:
-
Open WDS Management Console: Launch the Windows Deployment Services console (Server Manager > Tools > Windows Deployment Services).
-
Navigate to Install Images: In the WDS console, expand the “Servers” section, then expand your WDS server name. Right-click on the “Install Images” node and select “Add Install Image.” This will launch the Add Install Image Wizard.
-
Image Group Selection: The wizard will ask you to either select an existing image group or create a new one. For the first install image, choose “Create a new image group.” Enter a name for the image group, such as “Windows OS Images,” and click “Next.” Image groups are used to organize install images within WDS. If you already have image groups, you can choose to add the new image to an existing group.
-
Browse for
install.wim: In the “Image File” field, click “Browse” and navigate to the location where you saved theinstall.wimfile (converted frominstall.esdor directly from the installation media). Select theinstall.wimfile and click “Open.” -
Image Selection (if multiple editions): If the
install.wimfile contains multiple Windows editions (e.g., Home, Pro, Enterprise), you will be presented with a list of images within theinstall.wimfile. Select the specific Windows edition(s) you want to deploy and click “Next.” You can select multiple editions if needed. -
Image Name and Description: For each selected image, you can customize the “Image name” and add a description. Ensure the “Image name” is descriptive as this will be presented to users during the deployment process. For example, “Windows 10 Pro x64” or “Windows 11 Enterprise.” Click “Next” after reviewing or modifying the names and descriptions.
-
Summary and Confirmation: Review the summary of the install image(s) you are about to add. Click “Next” to begin importing the install image(s) to the WDS server.
-
Import Process: The wizard will display the progress of importing the install image(s). This process can take several minutes depending on the size of the
install.wimfile. Wait for the import to complete. -
Completion: Once the import process is finished, you will see a “Successfully added install images” message. Click “Finish” to close the wizard.
The install image(s) are now successfully added to the WDS server and are ready to be deployed to client machines. You can now boot client computers from the network (PXE boot) and initiate the Windows installation process through Windows Deployment Services.
Diagram: Windows Deployment Services Workflow
mermaid
graph LR
    A[Client Computer (PXE Boot)] --> B(DHCP Server - IP & PXE Info);
    B --> C{WDS Server?};
    C -- Yes --> D[WDS Server (Boot Image - boot.wim)];
    C -- No --> E[Normal Boot Process];
    D --> F(Client Boots into Windows PE);
    F --> G{User Authentication & Image Selection};
    G --> H[WDS Server (Install Image - install.wim)];
    H --> I(OS Installation on Client);
    I --> J[Client Computer (Windows OS)];
With WDS successfully installed and configured, and boot and install images added, you have established a robust infrastructure for streamlined Windows deployments across your network. Remember to configure your client machines to boot from the network (PXE boot) in their BIOS/UEFI settings to initiate the deployment process.
Feel free to leave your comments and questions below if you encounter any issues or have further inquiries regarding Windows Deployment Services setup.
Post a Comment